
Securing Network Traffic: SSL/TLS and HTTPS
Although we usually hear about SSL/TLS in the context of securing HTTP traffic, it can actually be used to secure any socket connection. Today I explore what this looks like in Python.
Motivating example: network messages are plaintext
Let’s build a toy service that listens on a socket, and echoes back whatever text it receives, but uppercased:
import socket

host = "127.0.0.1"
port = 56789

def handle_connection(conn):
    while True:
        data = conn.recv(1024)
        if not data:
            # Empty response means disconnected (TCP messages have at least one byte)
            break
        data = data.decode("utf-8")
        data = data.upper()
        conn.sendall(data.encode("utf-8"))


def run_server():
    with socket.socket(socket.AF_INET, socket.SOCK_STREAM) as sock:
        sock.bind((host, port))
        sock.listen()
        conn, addr = sock.accept()
        handle_connection(conn)


run_server()
We can test this inside a telnet session:
➜ ~ telnet 127.0.0.1 56789 0.000s
Trying 127.0.0.1...
Connected to 127.0.0.1.
Escape character is '^]'.
this text will be returned uppercase
THIS TEXT WILL BE RETURNED UPPERCASE
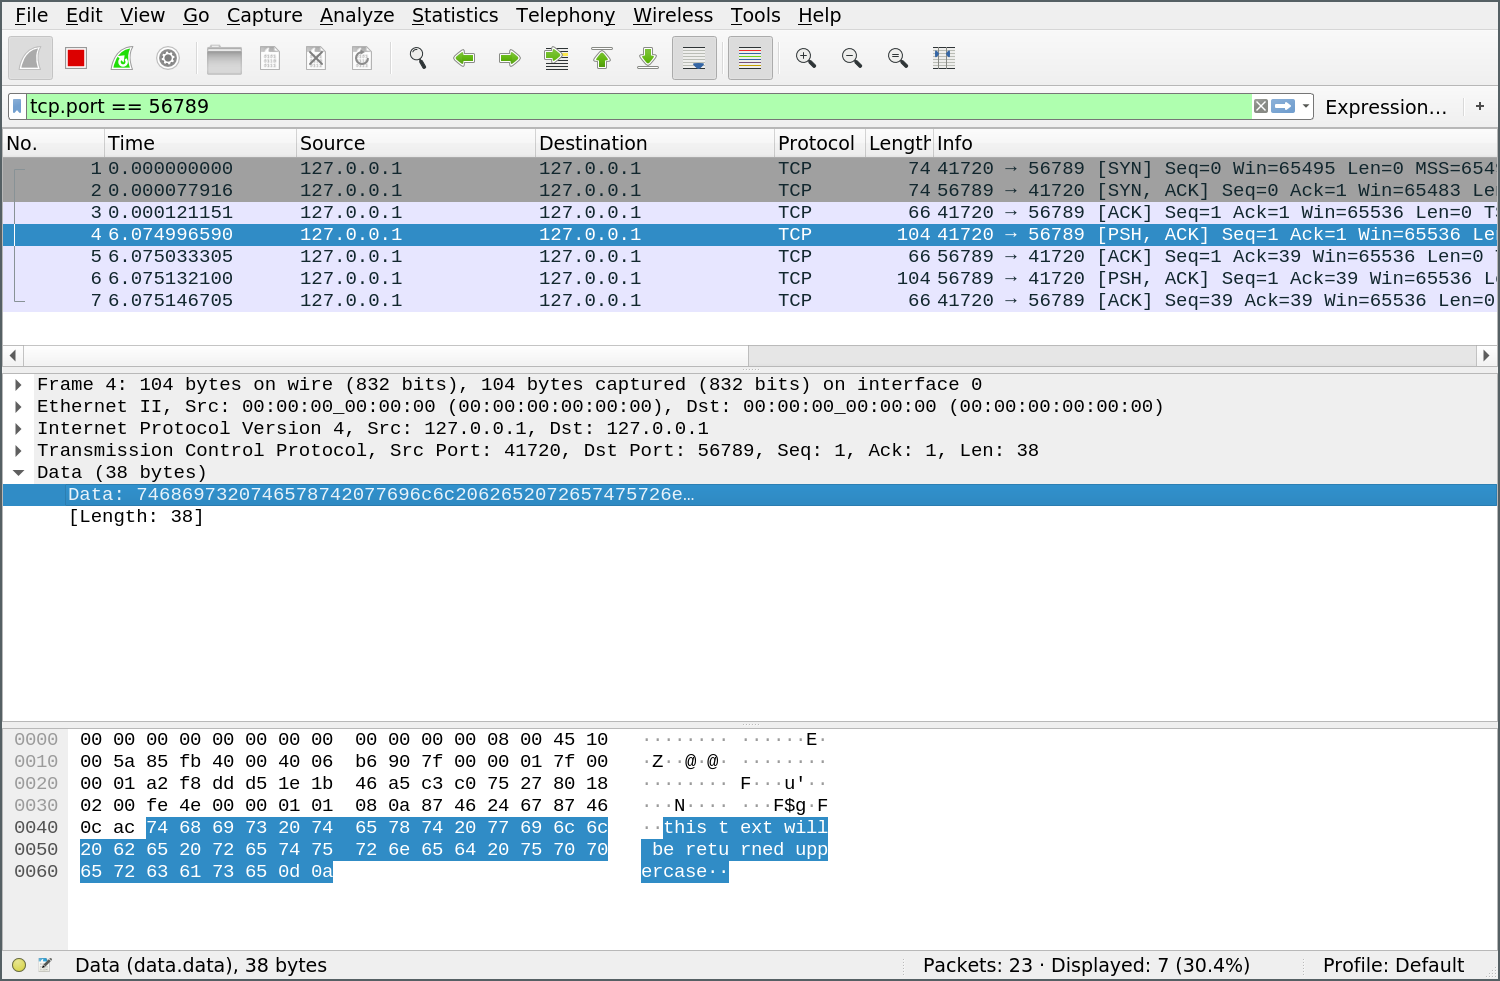
^]This information is transmitted in plaintext, which we (and anyone else) can see by capturing network traffic in Wireshark:
Enter TLS
The Transport Layer Security (TLS) protocol sits on top of TCP, and provides one or more of:
- Privacy: data is encrypted using symmetric cryptography, and cannot be read by a man-in-the-middle.
- Authentication: the identity of the server (and sometimes also the client) is authenticated using public-key cryptography, so that a man-in-the-middle cannot impersonate one of the parties.
- Reliability: messages include an integrity check.
To secure our connection in practice, we need to (1) generate a X.509 certificate and (2) add TLS to our server.
Generating a certificate
This is easy with openssl (for now, just press Enter to accept the defaults):
➜ openssl req -x509 -sha256 -nodes -days 365 -newkey rsa -keyout privateKey.key -out certificate.crt
Generating a RSA private key
........+++++
......................................................................+++++
writing new private key to 'privateKey.key'
-----
You are about to be asked to enter information that will be incorporated
into your certificate request.
What you are about to enter is what is called a Distinguished Name or a DN.
There are quite a few fields but you can leave some blank
For some fields there will be a default value,
If you enter '.', the field will be left blank.
-----
Country Name (2 letter code) [AU]:
State or Province Name (full name) [Some-State]:
Locality Name (eg, city) []:
Organization Name (eg, company) [Internet Widgits Pty Ltd]:
Organizational Unit Name (eg, section) []:
Common Name (e.g. server FQDN or YOUR name) []:
Email Address []:
This creates a certificate and a private key, which we can provide to the server. Note this certificate isn’t signed by anybody trustworthy yet (it’s “self-signed”) so others will not implicitly trust it.
Adding TLS to our server
Python has a ssl [1] package which makes this easy. First we make a SSLContext to load the cert and private key, then we use that to wrap the regular TCP socket [2]:
import ssl

def handle_tls_connection(conn):
    context = ssl.create_default_context(ssl.Purpose.CLIENT_AUTH)
    context.load_cert_chain(certfile="certificate.crt", keyfile="privateKey.key")
    with context.wrap_socket(conn, server_side=True) as s_conn:
        handle_connection(s_conn)


def run_server():
    with socket.socket(socket.AF_INET, socket.SOCK_STREAM) as sock:
        sock.bind((host, port))
        sock.listen()
        conn, addr = sock.accept()
        handle_tls_connection(conn)
We can’t use telnet anymore because it doesn’t support TLS, but openssl has a similar utility:
➜ certs openssl s_client -connect 127.0.0.1:56789
CONNECTED(00000003)
...
... [omitted a lot of details about the connection]
...
read R BLOCK
some text
SOME TEXT
Openssl shows us details about the certificate, then it warns that the certificate is self-signed. Finally, it drops us into a telnet-like session, where we can send a request and get a response.
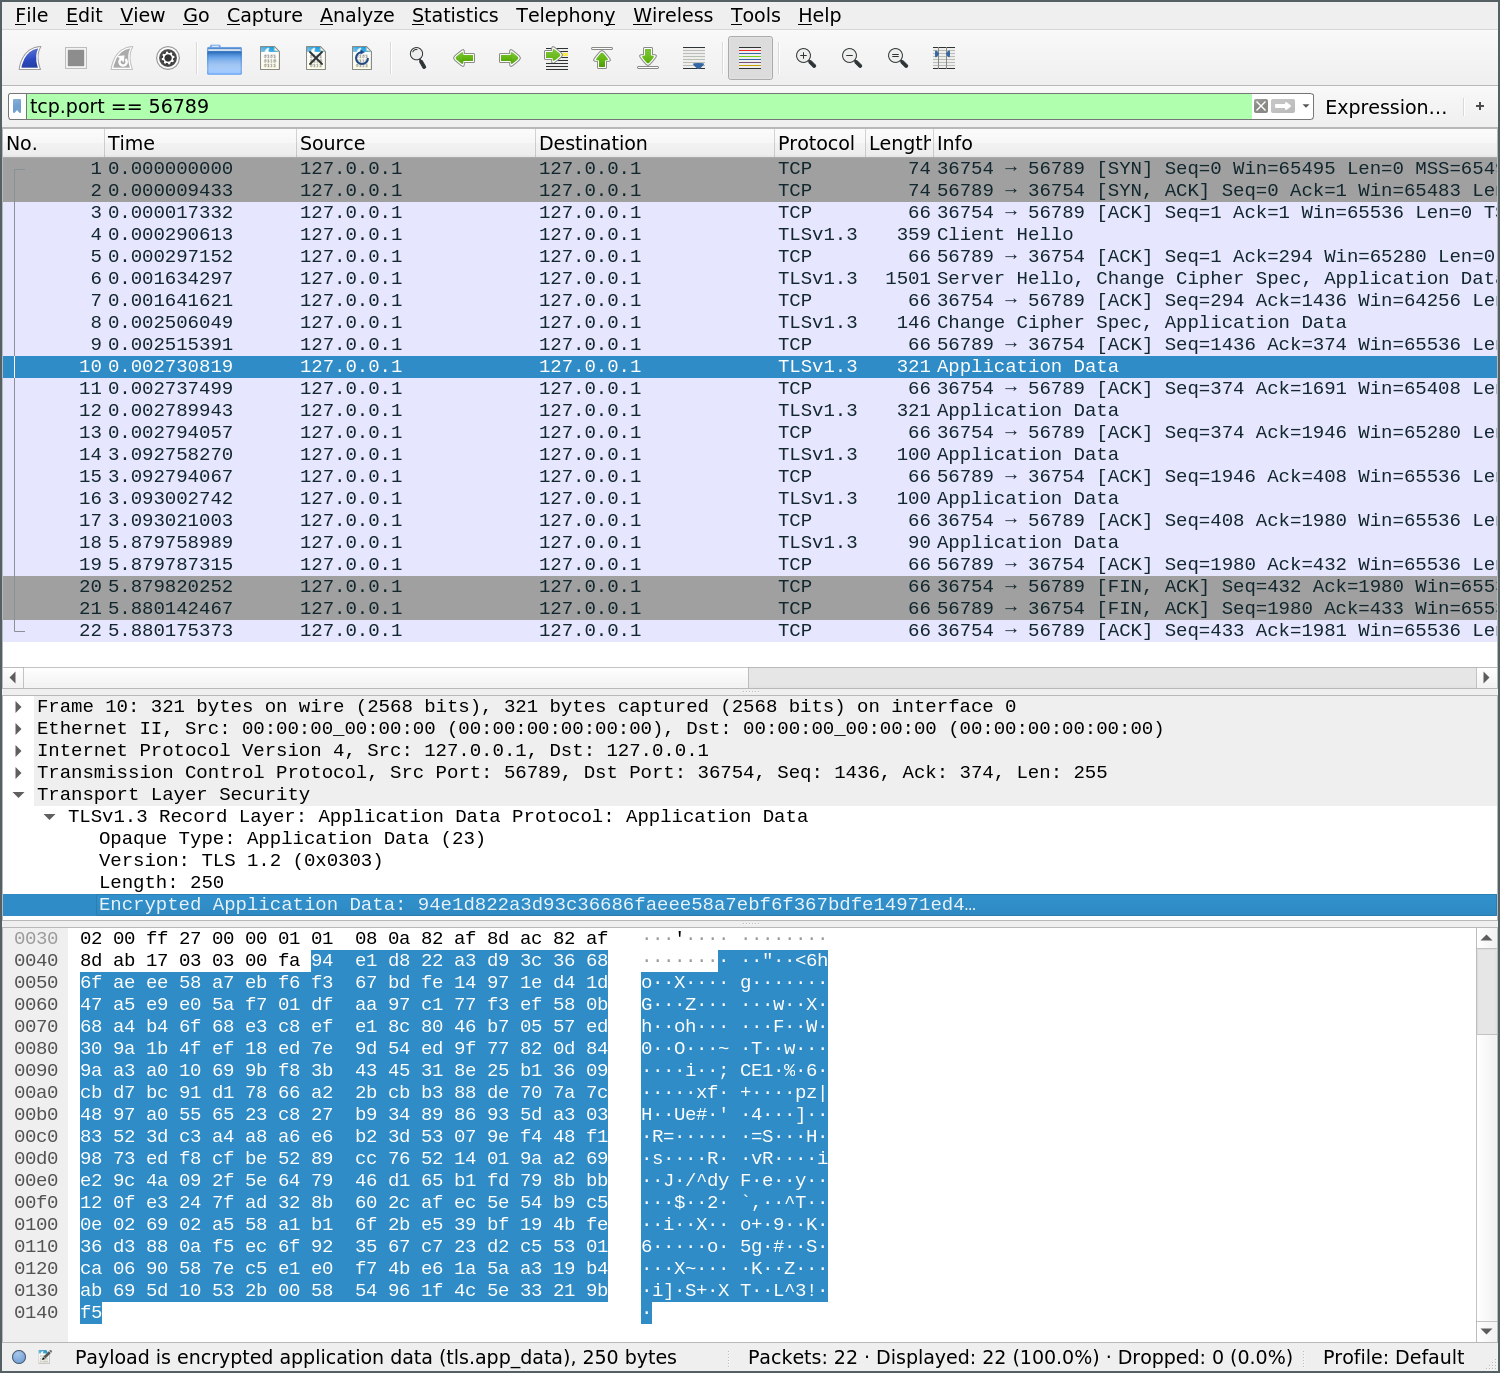
Using Wireshark, we can verify that our connection is indeed encrypted:
Debugging TLS connections in Wireshark
Encrypting connections is great, but what if we still want to debug what’s happening on the wire using a tool like Wireshark? Fortunately, Wireshark provides a tool called the TLS dissector that lets us read TLS packets as long as we have access to either the private key or a “key log file”.
Using a key log file is the preferred way, as it is more versatile. For example, it works even if the TLS connection has enabled forward secrecy[3]. However, we need to persuade the application (at either endpoint of the TLS connection) to write this keyfile. Fortunately, the OpenSSL library supports this (as do some other implementations like Google’s BoringSSL), therefore the functionality carries to most applications as well.
For many applications including Chrome and Firefox, you have to set the SSLKEYLOGFILE environment variable to a path where the key log file should be written. For s_client, we have to pass a command line argument instead: openssl s_client -keylogfile <filename> -connect 127.0.0.1:56789.
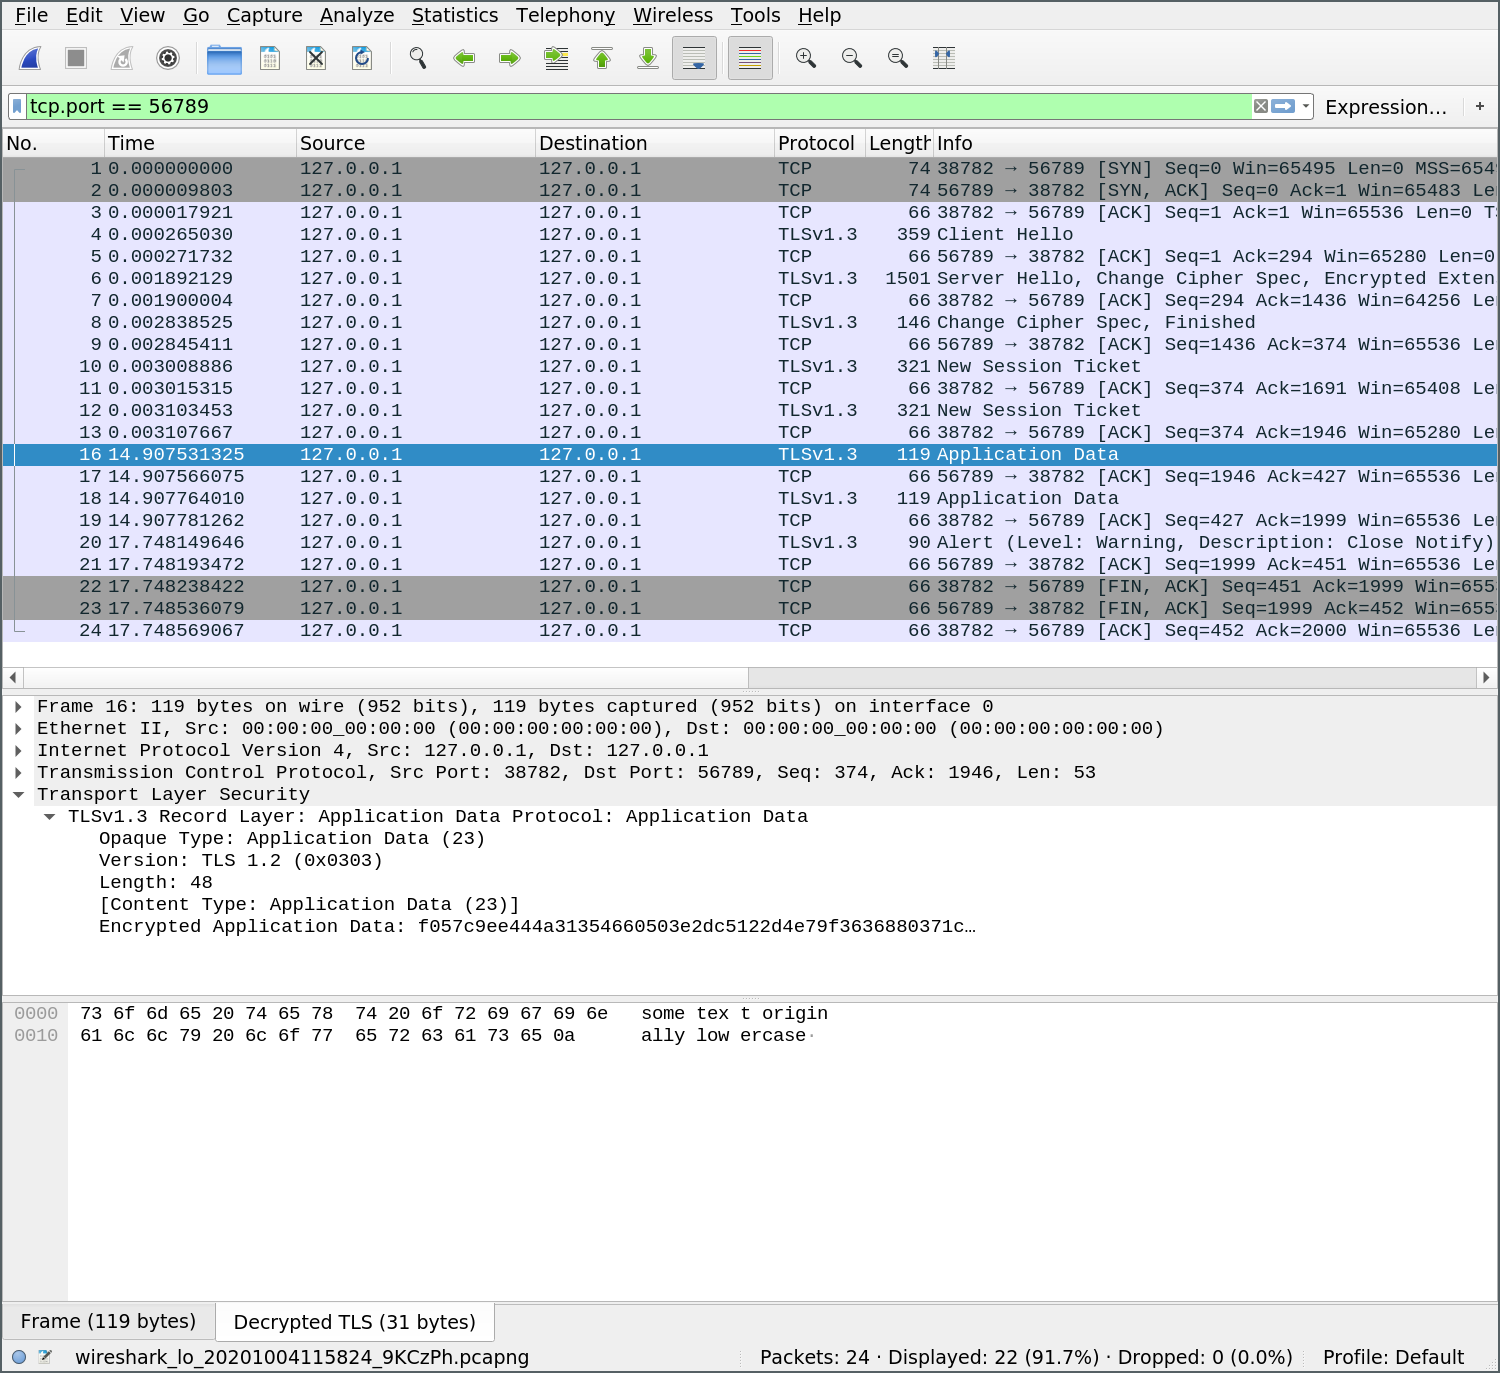
We can tell Wireshark about this key log file by going to Edit -> Preferences, choosing TLS under Protocols, and setting the (Pre)-Master-Secret log filename. The official guide also has detailed instructions.
After doing this, Wireshark will decrypt TLS traffic for us.
Establishing trust: authentication
So far we’ve encrypted the messages between client and server, but haven’t authenticated the server. This means we are still vulnerable to a man-in-the-middle attack where somebody else impersonates our server.
Let’s first write a simple Python client to replace our telnet session, to make everything more easily reproducible:
def client_request_response(ssock):
    ssock.connect((host, port))
    ssock.sendall("convert to upper".encode("utf-8"))
    received = ssock.recv(1024)
    print("Response:", received.decode("utf-8"))


def run_client():
    context = ssl.create_default_context()
    context.check_hostname = False
    context.verify_mode = ssl.CERT_NONE
    with socket.socket(socket.AF_INET, socket.SOCK_STREAM, 0) as sock:
        with context.wrap_socket(sock) as ssock:
            client_request_response(ssock)
This code isn’t doing any authentication, because we set context.verify_mode = ssl.CERT_NONE.
If we change CERT_NONE to CERT_REQUIRED, verification will fail because our system doesn’t trust the self-signed certificate from earlier. It’s possible to fix this by specifically loading the certificate we expect the server to use (or some other certificate that was used to sign that):
def run_client():
    context = ssl.create_default_context()
    context.load_verify_locations("certificate.crt")
    context.check_hostname = False
    context.verify_mode = ssl.CERT_REQUIRED
    with socket.socket(socket.AF_INET, socket.SOCK_STREAM, 0) as sock:
        with context.wrap_socket(sock) as ssock:
            client_request_response(ssock)
Adding hostname verification
In the example above, hostname verification is still disabled (because we set context.check_hostname = False). To fix this, we need to issue a new certificate that contains the server’s hostname. We can do this using an openssl config file:
[req]
default_bits  = 4096
distinguished_name = req_distinguished_name
req_extensions = req_ext
x509_extensions = v3_req
prompt = no

[req_distinguished_name]
countryName = XX
stateOrProvinceName = N/A
localityName = N/A
organizationName = My Org
commonName = Self-Signed Certificate for George

[req_ext]
subjectAltName = @alt_names

[v3_req]
subjectAltName = @alt_names

[alt_names]
IP.1 = 127.0.0.1
DNS.1 = localhost
Then we issue the certificate with openssl: openssl req -config ssl.cfg -x509 -sha256 -nodes -days 365 -newkey rsa -keyout privateKey.key -out certificate.crt.
We can verify that the new certificate has our host information:
➜ certs openssl x509 -in certificate.crt  -text -noout | grep -C 3 IP
                Exponent: 65537 (0x10001)
        X509v3 extensions:
            X509v3 Subject Alternative Name:
                IP Address:127.0.0.1, DNS:localhost
    Signature Algorithm: sha256WithRSAEncryption
         4f:28:1d:57:fa:92:21:cc:b1:07:9f:0d:1c:1e:15:64:d1:99:
         46:89:0f:7a:6b:b7:5d:60:25:bb:7f:49:63:01:50:68:eb:cb:
Finally, we can enable context.check_hostname and set the expected server_hostname:
def run_client():
context = ssl.create_default_context()
context.load_verify_locations("certificate.crt")
context.check_hostname = True
context.verify_mode = ssl.CERT_REQUIRED
with socket.socket(socket.AF_INET, socket.SOCK_STREAM, 0) as sock:
with context.wrap_socket(sock, server_hostname="localhost") as ssock:
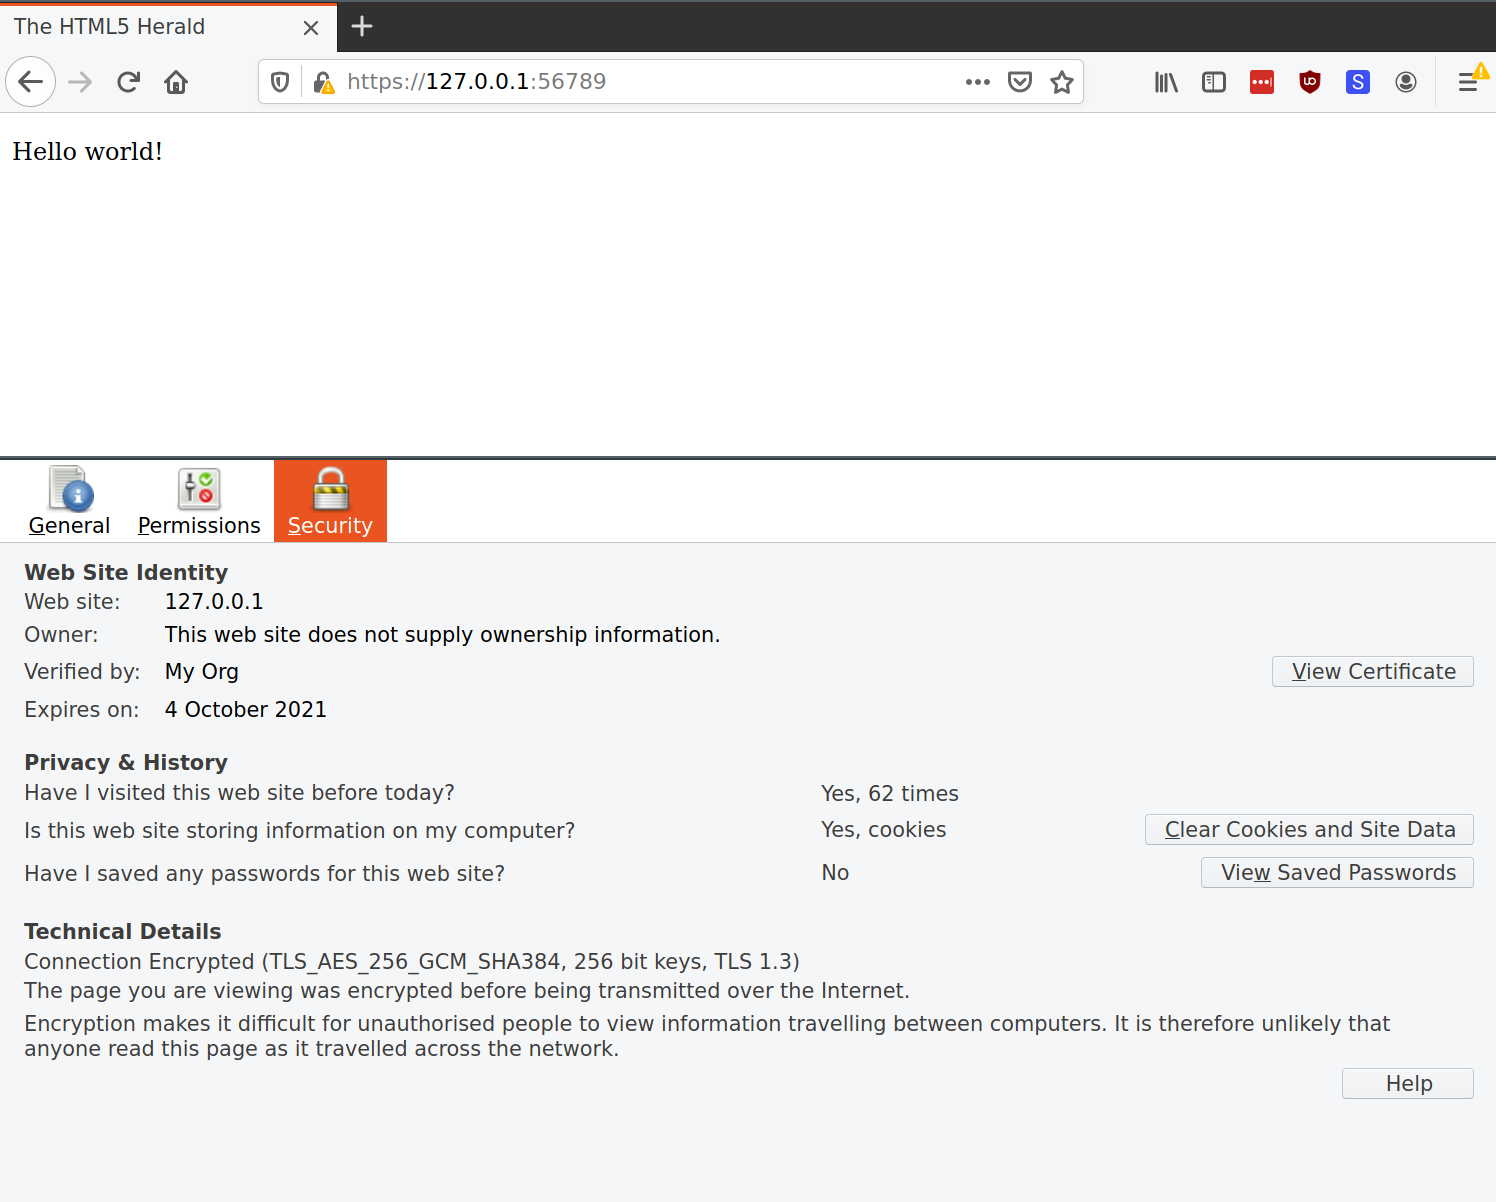
client_request_response(ssock)At this stage, we can also use a browser to view this response. Just modify our server code (handle_connection) to serve a static HTTP 200 response first. (Note there is still a certificate warning because this certificate is self-signed and I didn’t add it to my root certificates list).
Bonus: How can we serve multiple sites/domains from the same server?
In many situations, one server (and one IP address) serves many websites. For example, I might want to serve both www.brova.com and www.brova.org traffic from the same DigitalOcean droplet. Many webservers support this - for example, a single Nginx instance can serve HTTP traffic for different domains, as configured using the server_name property. This is easy to do for HTTP, because the full URL, including the domain name, is part of the GET request.
Things get tricker for HTTPS, because the server needs to show a certificate during the initial handshake process, before it can read the headers of the GET request.
One approach is to add multiple domain names to the same certificate, using multiple Subject Alternative Name entries. This way, a single certificate can certify many domains. However this approach isn’t great, because adding, removing, or modifying a single domain requires reissuing the certificate (for all domains).
Enter SNI
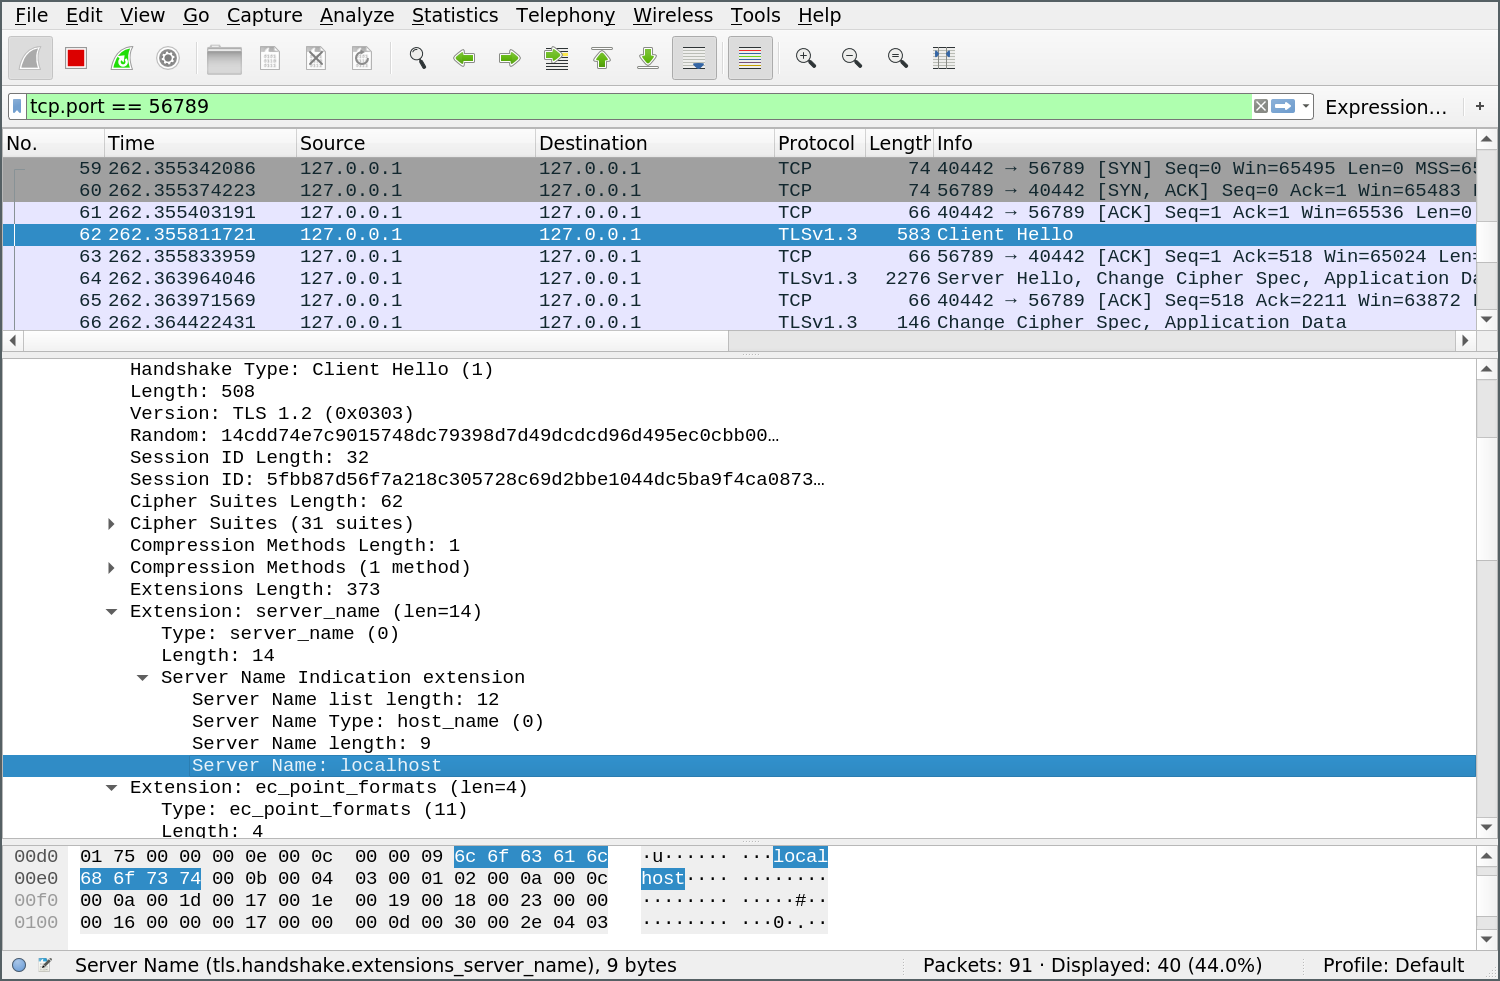
Server Name Indication (SNI) is an extension to TLS, which allows the client to specify the domain name it wants to connect with in the ClientHello message. The server can therefore listen for this and issue the appropriate certificate.
We can see the desired hostname get passed through in Wireshark (unencrypted, because it’s part of the handshake process):
Supporting SNI in Python
Python’s ssl module exposes a SSLContext.sni_callback function, which we can use to load the correct certificate. This function gets called during TLS setup, so we can add code to load and use the correct certificate.
def get_certfile_keyfile_for_server_name(server_name):
    # For now we just have one certificate, but in principle we
    # would select the right one here
    print("Loading certificate for server:", server_name)
    return "certificate.crt", "privateKey.key"


def my_sni_callback(sock, server_name, ssl_context):
    certfile, keyfile = get_certfile_keyfile_for_server_name(server_name)
    sock.context = make_server_ssl_context(certfile, keyfile)


def make_server_ssl_context(certfile, keyfile):
    context = ssl.create_default_context(ssl.Purpose.CLIENT_AUTH)
    context.load_cert_chain(certfile=certfile, keyfile=keyfile)
    return context


def handle_tls_connection(conn):
    default_certfile, default_keyfile = "default.crt", "default.key"
    context = make_server_ssl_context(default_certfile, default_keyfile)
    context.sni_callback = my_sni_callback
    with context.wrap_socket(conn, server_side=True) as s_conn:
        handle_connection(s_conn)
Conclusion
By playing with TLS for a bit, I learned several cool things:
- Even though we often associate TLS with HTTPS, it can actually be used to secure any TCP connection.
- Generating and signing X.509 certificates isn’t that scary!
- To get a browser to accept a certificate, it needs to (1) be signed (directly or indirectly) by a trusted root certificate, and (2) match the hostname the client expects to communicate with.
- To make TLS work for the modern web, we need a way to let the same server use different certificates for different domains. The SNI extension makes this possible (and it’s not hard to use in Python)
- When debugging (or learning about) networking issues, Wireshark is an extremely versatile tool to understand what’s happening on the wire.
I’ve uploaded the full code for this exploration as a gist.
-
Even though SSL is deprecated in favor of TLS, the name is still quite common and some people use them interchangeably. I guess this sort of makes sense, since they solve essentially the same problems. ↩
-
In this snippet, we set the Purpose of the SSLContext of the server as
Purpose.CLIENT_AUTH. This is surprising at first because there is also aSERVER_AUTH. According to the docs, usingSERVER_AUTHseems to require that the client also authenticate. Indeed, the server code examples useCLIENT_AUTH, and changing toSERVER_AUTHraises an exception indicating the client should have authenticated (ssl.SSLError: [SSL: PEER_DID_NOT_RETURN_A_CERTIFICATE] peer did not return a certificate). ↩ -
Forward secrecy: Using an algorithm like Diffie-Hellman key exchange, it is possible to ensure that future messages cannot be decrypted even if an attacker has one of the private keys used for authentication. TLS uses this approach in ephemeral modes (EDH / DHE). ↩